

When it comes to vinyl applications, one size does not fit all. The type of wall on which you apply...
.jpg?width=920&height=614&name=1080-Gloss%20Flip%20Psychedelic-1%20(1).jpg)
Vinyl is a versatile material that can be used for a variety of projects, from decorating your home to creating custom clothing. However, removing vinyl can be a challenge. In this blog post, we'll discuss the best practices for removing vinyl.
Why Vinyl Won’t Come Off Easily
It depends on how long it's been there, what type of vinyl it is, what surface it's on, the condition of the vinyl, and the size of the vinyl.
Removable vinyl is easier to remove than permanent vinyl. Vinyl is easier to remove from smooth surfaces like glass or metal than from rough surfaces like wood or concrete.
Vinyl that is old, damaged, or exposed to the elements may be easier to remove. Larger pieces of vinyl are typically more difficult to remove than smaller pieces.
What to Avoid
When removing vinyl from cars and windows, avoid the following methods or use caution.
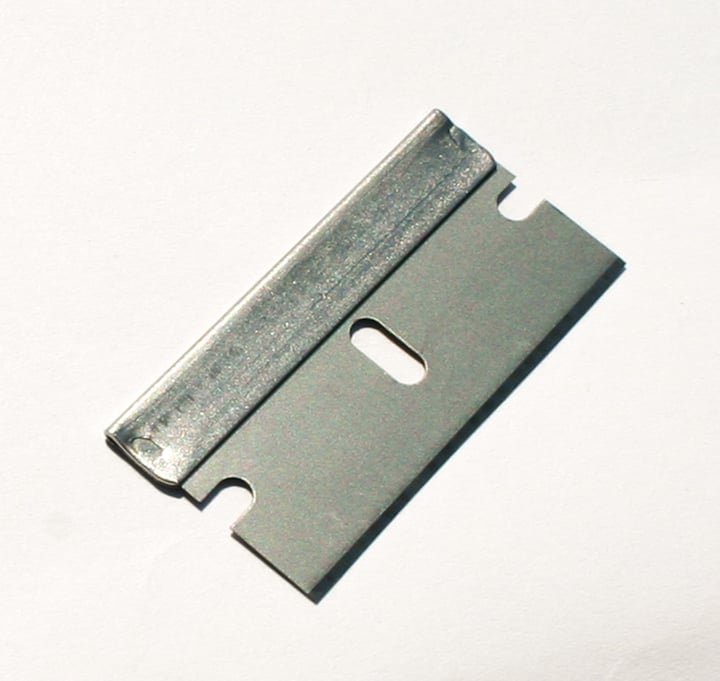
Abrasive Solutions: Think X-ACTO type knives and razor blades. These tools can damage the substrate you're removing from and make the situation worse.
Aggressive Scraping: Even tools that allow you to scrape off whole window decals quickly should be used with caution. Using these tools too aggressively can cause you to cut into the film commonly placed over glass. If you find that you need to scrape, be sure to do so slowly and carefully.
Using a Vinyl Remover or Adhesive Remover without Testing: You don't know how a substrate or vinyl will react to vinyl remover or adhesive remover, so it's best practice to always do a test patch before continuing. Apply the remover to a small area of the vinyl and wait a few minutes. If the remover damages the substrate, do not use it on the rest of the vinyl.
Heat is King
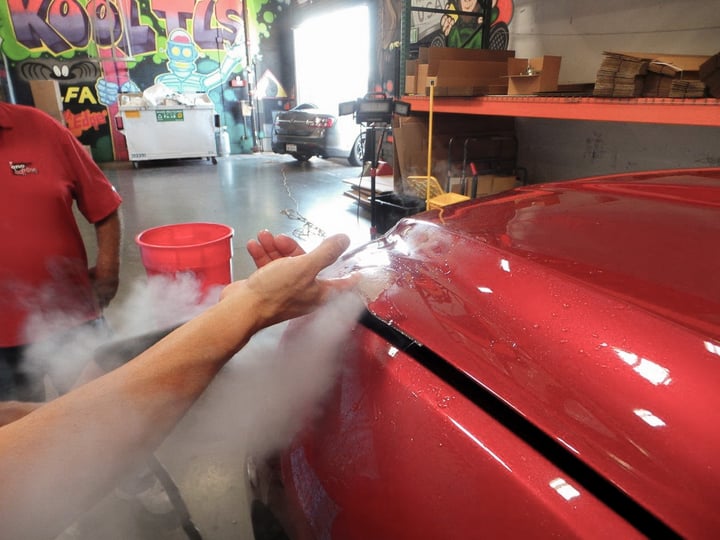
Removing vinyl is not a quick or easy process. It takes patience and heat.
Many experts recommend using a heat gun to soften the adhesive on the vinyl before trying to remove it. Once the adhesive is softened, you can start to peel the vinyl away from the surface. Be careful not to pull too hard, as this could damage the surface. Instead, pull the vinyl slowly and steadily.
If you can get a corner of the vinyl started, you can make the process go more quickly. Once you have a corner started, you can use a plastic scraper to peel the vinyl away.
It is important to work from the edge of the vinyl and peel it away slowly. If you try to peel it off too quickly, you could damage the surface.
Once you have removed the vinyl, you may need to clean the surface with soap and water to remove any remaining adhesive residue.
Here are some things to avoid when removing vinyl:
- Do not use abrasive tools, such as a razor blade or putty knife. These tools can damage the surface.
- Do not use too much heat. Too much heat can damage the vinyl or the surface.
- Do not use chemicals that are not designed for removing vinyl. These chemicals can damage the surface.
With patience and heat, you can remove vinyl from any surface.
Vinyl Removal Tools
Besides heat, there are several tools you can use to help you remove vinyl such as:
- Power tools: There are power tools like the MBX Vinyl Zapper, a rubber tool that is meant for substrates like metal, glass, or fiberglass. These handheld tools can make the work easier, but they are not recommended for certain vinyl types or types of vinyl decals like lettering.
- Hand tools: There are other recommended hand tools such as plastic razors and chiselers that can help in peeling up the vinyl. Most of the tools used to remove vinyl are plastic or rubber to limit the possibility of damaging the substrate you're removing from. Any tool you use, and even heat, should be used with caution to avoid such damage and liability to you and your company.
The final step of the process is to finish removing any leftover adhesive the vinyl left behind.
- Adhesive removers: There are several adhesive removers to aid in this step. Again, be sure to test the adhesive remover on an inconspicuous area of the vinyl first to make sure it does not damage the substrate.
- Cleaning: Once you have removed the adhesive, you will need to clean the surface with soap and water to remove any remaining residue.
By following these steps, you can remove vinyl from any surface and prepare it for new vinyl.
Removing vinyl can be a challenging task, but it is definitely possible with the right tools and techniques. There is no one-size-fits-all solution, as the best method for removing vinyl will vary depending on the type of vinyl, the surface it is applied to, and how long it has been there.
It is important to be patient and persistent. It may take some time and effort, but it is definitely possible to do it without damaging the surface.
Check out our selection of Vinyl from Top Brands like Avery Dennison, ALPHA, Arlon, 3M, Gerber, Lumina by FDC, Arlon, Mactac, ContraVision, R Tape, Quick Sign Gold.
Watch this video to see how easy removing vinyl can be.
.png?height=200&name=Wrap%20Vinyl%20Vs.%20Non%20Wrap%20Vinyl%2010-23%20(1).png)